Showing posts with label Pictures. Show all posts

Saturday, October 27, 2007

A Much Needed Break

Last weekend Amy and I took a much needed break from the rigors of home ownership to go for a hike along the Appalachian Trail in nearby Berks County. It was a wonderful reprieve from the endless project list that always sits in wait for us.


For anyone who hasn't visited this lovely spot, I highly recommend it! The views were gorgeous, despite the alarming lack of fall color. It's known locally as "The Pinnacle", and is located just east of Hamburg, only a few miles of I-78.


View Larger Map

My only suggestion is to arrive early (we started our hike at approximately 8:15am), as it is a very popular place. We encountered two groups of scouts, numerous school groups, and even a few through hikers that had come up all the way from West Virginia.

This weekend, we're looking to get back on track with some paint in the back bedroom, as well as finishing up some electrical work. We had a friend do a good bit of the work, including ripping out most of the remaining knob and tube. He also found evidence of old gas lines in the ceiling above the second floor, leading us to believe that this was the original source of light for the house. Pretty amazing what you can find out when you rip up a few floorboards!

Monday, September 03, 2007

The Continuing Saga Of Windows


After a few more days of hard work, we finally have both new windows installed in the back bedroom! Both have been secured, insulated, caulked, and partially trimmed. All that remains is to install interior trim for both sides. It was a long and arduous task, but ultimately, the rooms looks much nicer. And I swear that it stays cooler with the A/C on, though I'm sure scientifically that doesn't make sense.


We started by shoving insulation into the cavity where the old balance weights were. Should you ever wish to attempt this, I highly recommend long sleeves; that fiberglass insulation made me itch something fierce (and this was the "low-itch" stuff!). I just used a spare piece of trim to push it up as far as I could. At the end, the cavity was completely filled.


Next we framed out the window opening, since the windows we bought we slightly smaller than the original openings (such is the price we pay for not spending huge amounts of money on custom windows). Here's Amy screwing a 2x4 with a 1x4 on the bottom into the top of the original opening. Note the shims; as with any old house, the openings were anything but level.


By the way, have I ever mentioned how drop-dead sexy my wife is when she's using power-tools? That bulky respirator and the snazzy safety-glasses only add to the whole "Tool-Time Girl" appeal she's got. Honey, Amy-Wynn whatever-her-name-is ain't got nothing on you! :)


After all the prep work it was actually pretty easy to install the window itself. All we did was lay it into the space previously occupied by the sashes, and secure it with screws to the sides of the frame. We caulked around the inside and outside of the window to help seal it in place and prevent drafts (no point in buying a brand new window if there's gaps the size of a canyon around it).


The trim around the outside was actually so rotted that we ended up replacing it as well. We used 2x3 posts that were primed and cut to length, secured with screws. Before putting these up we used a good half-can of "Great Stuff" expanding foam in the space between the bricks and the inner frame. Hopefully that will help eliminate and air pockets. That stuff is great, by the way, albeit a pain to use after the initial run. The little delivery tube always clogs and is impossible to clear, and the stuff is impossible to get off anything it touches. Still not as bad as that blasted fiberglass stuff.


The second window actually was far easier to get in. Probably a mix of experience (from the first one) and pure luck that no unexpected twists came along, other than Amy's drill (Christmas present from our first year together) finally bit the dust. Hmmm... that brings our total "Tools Killed" count to three. No matter, it was quickly replaced by a brand new DeWalt heavy duty model. That thing could drill a hole through a tank.


Now all that's left is to paint the walls, put in the laminate flooring, hook up the electrical power, and we'll actually have completed our first big home project! It only took, well, let's see... errr... I'll get back to you on that one.

Sunday, May 20, 2007

In Which Our Homeowners Purchase A New Toy, And Ask For Your Help!

As you can see above, we finally decided to bite the bullet and purchase a nice gas trimmer. After using it, I can really say it makes a world of difference in how the lawn looks. Previously we had been using a pair of large shears to trim where necessary, which was obviously not terribly efficient. But with this new gadget, weeds were falling like logs!
Here's Amy taking it to a patch of grass near our laundry line. Because it's so close to the fence, getting in here with a mower was just about impossible, so we had basically let it just grow out. Not the most visually appealing of stratagies. But now the grass is no match for our gasoline powered killing machine! :)

We also spent a good part of the day weeding our flower beds. It seems that chickory root has a particular liking for our yard, as it seems to sprout up every few inches. And since we've decreed our lawn to be chemical free, it means we have to get rid of it the old fashioned way, with our trusty Cape Cod Weedah (yes, I'm told it is spelled that way) and some elbow grease. In the process we also discovered an ant colony hiding under one of the beds, which was fun until the inhabitants decided to swarm out en masse to meet the intruders in battle. Guess we'll have to come back to that part, huh?

And now, dear friends, we need your help in a big way. You see, we inherited this lovely garden along with the house, but have several plants that neither of us can seem to identify. So without further ado, I proudly announce the first of our series:

Name That Plant!
Our first mystery item is a medium sized shrub that sits in the corner of our yard by the house. It recently burst into glorious white and pink blossoms, and smells somewhat like honeysuckle. As you can see in the picture below, it has a green and white variated (I think that's the technical term for this pattern of color) leaf as well.
The first reader to give us an answer (and I'll have to trust you're right, since I've no clue what it is) will receive a wonderful prize!

Um... ok, so we don't really have a budget for a great prize. But you will have the distinct honor of being the first to answer our little quiz! That and our eternal gratitude of course (not sure if that has any value on the market these days, hehe).

Let the games begin!

Tuesday, February 13, 2007

Our First Homeowner (Semi) Emergency!

On Sunday, our washing machine decided it was going to quit working in the middle of a load of wash. We tried various methods of coaxing it into working, ranging from asking it nicely to slamming the lid in disgust. When the latter actually brought about some change, I guessed the problem had something to do with the lid switch. So, I pulled out my trusty voltmeter (thanks Dad for reminding me to get that) and cracked open the back panel of the washer. One problem: the washer is in a position that can't be moved very much, so I was forced to climb behind it!


Needless to say, this was not a particularly comfortable position! First, I had to drain the supply lines (hence the re-used Philadelphia Eagles popcorn tin), then crawl behind the machine to unplug it. Let me tell you, there are very few places filthier than behind the washer and dryer!

Here's a pic of the necessary tools assembled:


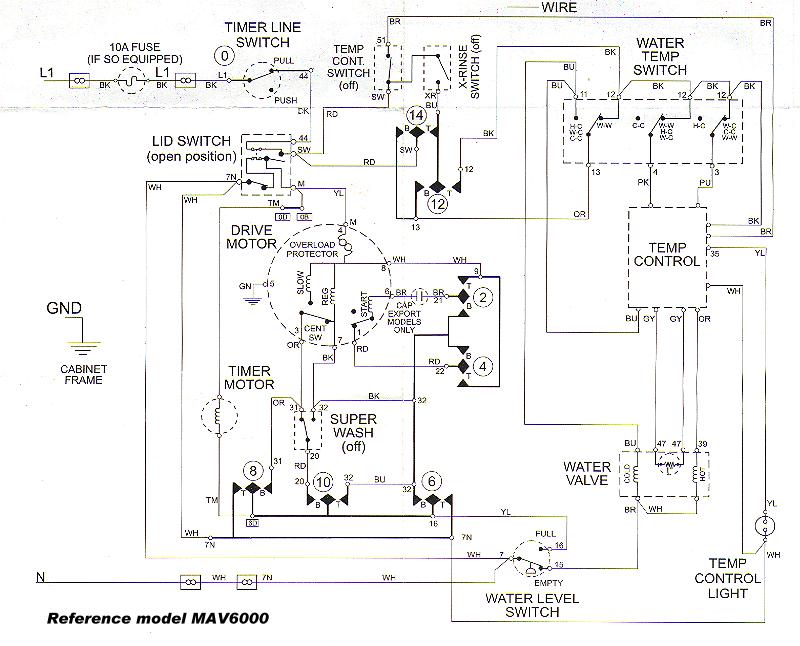
So I didn't electrocute myself, or wreck the machine in the process, I acquired a wiring diagram for the machine. Well, OK, we found one stuffed into the back panel. But I would have gotten one if we hadn't found this one! :) Here's what it looks like:


Thanks to www.applianceaid.com for the diagram.

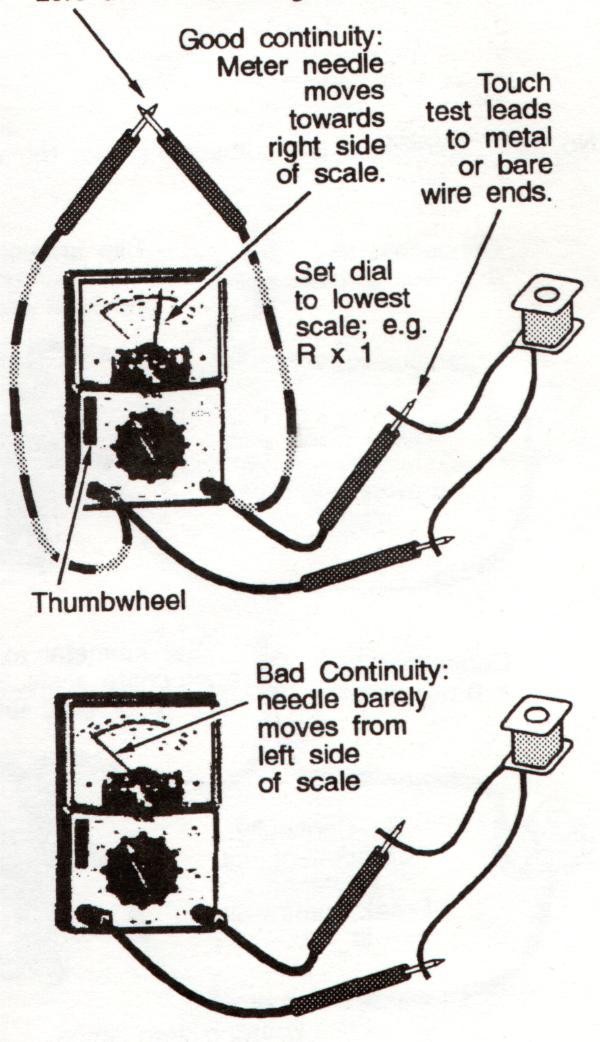
First, I tested the switch for continuity (that's a fancy way of saying I wanted to see if the lid switch actually worked). Here's a great diagram of how to accomplish this:


Needless to say, the switch failed miserably. I basically ended up hot-wiring the thing so that it always behaved as if the lid was closed, by connecting the red, black, and yellow wires together. After plugging the machine back in, I crawled out and turned the washer back on. Thankfully, it worked on the first try! We're ordering the part from a local appliance shop, and it will hopefully arrive soon. Until then, at least we have a working washer!

*WARNING*: I did this because we don't have kids, and neither I nor my wife plan on sticking our hands in the machine while it's running. I don't recommend it if you have little ones running around.

Wednesday, January 31, 2007

Whoops!

Guess I forgot to turn the comment feature of Blogger on! My apologies for anyone who wanted to leave any tips for the last post.

Anyway, here's another pic of how the bedroom looks at the moment. As you can see, we have drywall everywhere. I actually saw a story in Dwell about a house where the owner left the drywall unfinished. Hmmm... laziness or avant garde artwork? Your guess is as good as mine, though I think we'll stick to traditional methods. :)

Speaking of art, that's actually Amy's dad David in the picture, who, by the way (*warning* shameless father-in-law brown-nosing coming up), has a wonderful business creating kinetic artwork. We actually have several of his pieces in our house, and visitors are always intrigued by them. Check out his site! www.woodthatworks.com.


Tuesday, January 30, 2007

It's Beginning To Look Like A House!


Well, after a weekend of hard work, I can say with all honesty that our first floor is done! With the exception of hanging a few pictures, we're just about where we wanted to be. Shelves are all hung, walls are painted, and we even had time to string up some lights in the front part of the floor. It feels really good to see one part of our vision of the house coming together.

We also spent a good part of the time working on our soon-to-be bedroom on the second floor. This was one of those projects that went from simple to ugly fairly quickly. To give you an idea of the history, the room originally looked like this:

Originally we were just going to re-paint the room, but then we discovered that a) the walls were all some kind of hardened masonite board, and b) the wiring was all sorts of crazy. In the end, we decided to tear out the plaster and start from scratch. For anyone who attempts this route, my two words of advice would be to 1) use a good mask, or else your lungs will punish you; and 2) realize that the demolition is probably the worst part of the process. We may well hire that part out in the future, if only to avoid carrying bags of debris up and down flights of stairs. Although, it is a lot of fun to carry out sanctioned destruction via a sawzall!


Several weeks, three garbage cans worth of plaster debris (and let me tell you, that stuff is HEAVY), one roll of Romex 12/2 wiring, and 12 sheets of drywall later, we are now taping and sanding the room in preparation for painting it. Once that's done, all that will be left is putting in a laminate wood floor, and we will have completed our first full out renovation!

Oh, and if anyone out there has some tips for putting in laminate floors, feel free to leave them here on the blog, as we've never tackled that before. Come to think of it, we've never really tackled any of this before!