Current Projects
Josh and I have each taken on different tasks to keep the house moving forward. Some are small and some are quite large.
My project, for the past couple of weeks, has been spackling and sanding the back bedroom to get it ready for primer. This has been my "outfit" for the project...
 And I sound like Darth Vador!
Josh's project was smaller, but just as necessary. Once of the annoying things with our kitchen was the doors on the fridge opened the wrong direction. Josh tackled the task today. Here are the pics from his adventure.


Saturday, February 17, 2007

Tuesday, February 13, 2007
Our First Homeowner (Semi) Emergency!
On Sunday, our washing machine decided it was going to quit working in the middle of a load of wash. We tried various methods of coaxing it into working, ranging from asking it nicely to slamming the lid in disgust. When the latter actually brought about some change, I guessed the problem had something to do with the lid switch. So, I pulled out my trusty voltmeter (thanks Dad for reminding me to get that) and cracked open the back panel of the washer. One problem: the washer is in a position that can't be moved very much, so I was forced to climb behind it!
Needless to say, this was not a particularly comfortable position! First, I had to drain the supply lines (hence the re-used Philadelphia Eagles popcorn tin), then crawl behind the machine to unplug it. Let me tell you, there are very few places filthier than behind the washer and dryer!
Here's a pic of the necessary tools assembled:
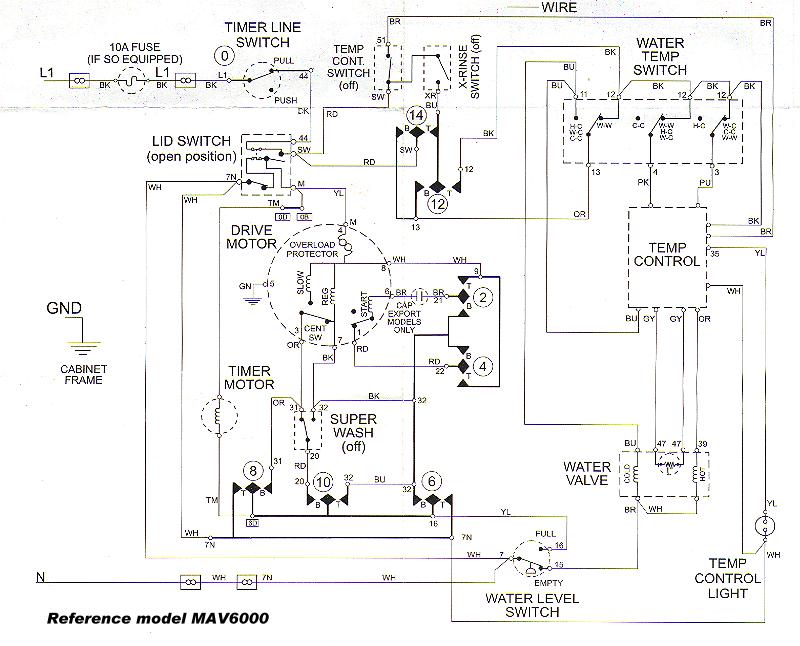
So I didn't electrocute myself, or wreck the machine in the process, I acquired a wiring diagram for the machine. Well, OK, we found one stuffed into the back panel. But I would have gotten one if we hadn't found this one! :) Here's what it looks like:
Thanks to www.applianceaid.com for the diagram.
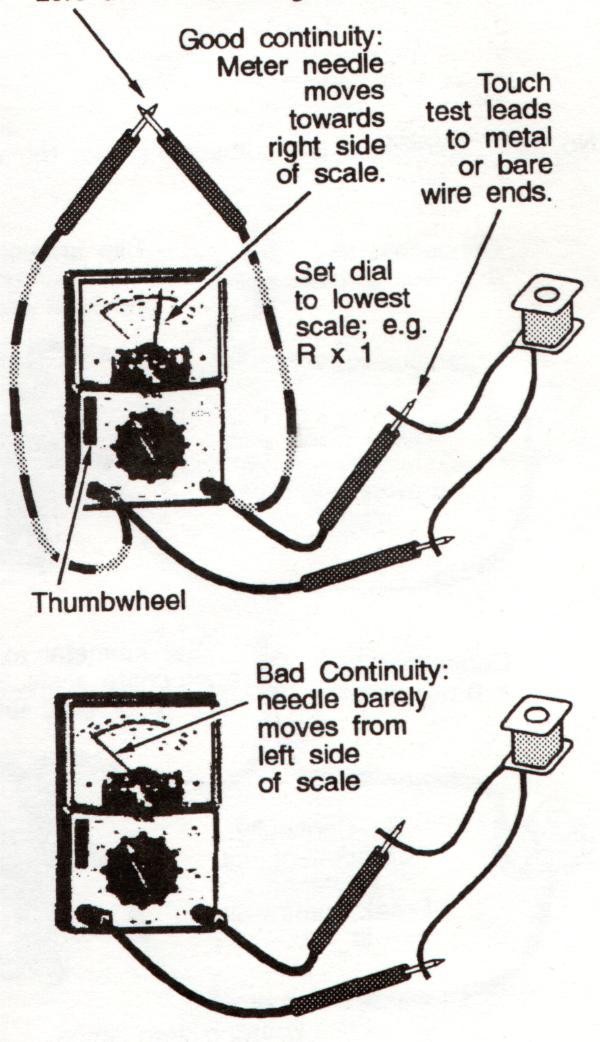
First, I tested the switch for continuity (that's a fancy way of saying I wanted to see if the lid switch actually worked). Here's a great diagram of how to accomplish this:
Needless to say, the switch failed miserably. I basically ended up hot-wiring the thing so that it always behaved as if the lid was closed, by connecting the red, black, and yellow wires together. After plugging the machine back in, I crawled out and turned the washer back on. Thankfully, it worked on the first try! We're ordering the part from a local appliance shop, and it will hopefully arrive soon. Until then, at least we have a working washer!
*WARNING*: I did this because we don't have kids, and neither I nor my wife plan on sticking our hands in the machine while it's running. I don't recommend it if you have little ones running around.


Sunday, February 11, 2007
Winterizing our Home:
We got our second oil bill the other day and were a little freaked out by how high it was. So we decided that we really needed towork on winterizing the parts of the house that were letting the cold air in and the hot air out. Some tasks have been easier that others.
• Adding foam outlet gaskets to the outlets/switches on the exterior walls vastly reduced the draft coming through the walls (see image to left). This is a very cheap and effective way to reduce those annoying drafts from coming through the walls. It's amazing what you can learn from a little searching around the Internet!
• We also took the time, finally, to go around and close all of the storm windows. Unfortunately that wasn't as simple as it sounds considering many of the windows in our house have been painted shut. A little elbow grease, a rubber mallet, and a utility knife did the trick on most of them.
• We had installed a programmable thermostat a while ago and it works wonderfully. The only problem was that the boiler seamed to be kicking on a lot during the day even though we had the temperature set for a constant 65 degrees. We decided to try turning it down to 63 degrees to see if that would help and it has drastically reduced the amount that the boiler kicks on. Saving money where we can is always a good thing!
Our biggest problem, however, didn't start out that way. Removing air conditioners is usually a pretty easy task. That is if the air conditioner was built in the last 20 years! We had a behemoth of an air conditioner in one of of first floor windows circa 1965. It also appears that it had never been removed since it was installed. I can only assume that the last homeowners didn't take it out of the window because it was a huge project - the bolts were all stripped and rusted solid, the windows were jammed making it difficult to unwedge. This picture shows what can happen to even the correct metal saw blade when dealing with difficult, rusted bolts. Josh made it through all the necessary cuts before the blade finally called it quits.
Once the bolts were cut we faced the challenge on unsticking the window to loosen the decades of paint that held it in place. It took a little coaxing from our trusty rubber mallet and a little wiggling of the air conditioner to finally break it free.
I got to stand in the warmth of the house to "catch" the air conditioner as Josh shoved it through the window. This took a little elbow grease and teamwork because the air conditioner came out in two parts. I've never seen an air conditioner like this before!
Here is Josh giving the air conditioner the heave-ho from the outside. After we removed the brackets that bolted it to the wall.
And here I am once the beast was removed! I definitely can say that this monstrosity will be making its way elsewhere - maybe a landfill or the home renovation sculpture I am planning in all of my spare time...
And here she is. The beast that Josh and I defeated!
Tuesday, February 06, 2007

This was my project this weekend.
Our kitchen has a great amount of space. However, the stove is off in the corner by itself with NO counter top nearby. The kitchen cart has helped out a lot. It's been up for only two days and has already gotten a lot of use.
I highly recommend this idea for anyone who needs a little added counter space in their kitchen. It was really easy to assemble.
http://www.kitchensource.com/kitchen-islands/hs-5216-95.htm
There are many different kinds out there but this one is very affordable
Wednesday, January 31, 2007
Whoops!
Guess I forgot to turn the comment feature of Blogger on! My apologies for anyone who wanted to leave any tips for the last post.
Anyway, here's another pic of how the bedroom looks at the moment. As you can see, we have drywall everywhere. I actually saw a story in Dwell about a house where the owner left the drywall unfinished. Hmmm... laziness or avant garde artwork? Your guess is as good as mine, though I think we'll stick to traditional methods. :)
Speaking of art, that's actually Amy's dad David in the picture, who, by the way (*warning* shameless father-in-law brown-nosing coming up), has a wonderful business creating kinetic artwork. We actually have several of his pieces in our house, and visitors are always intrigued by them. Check out his site! www.woodthatworks.com.
Tuesday, January 30, 2007
It's Beginning To Look Like A House!
Well, after a weekend of hard work, I can say with all honesty that our first floor is done! With the exception of hanging a few pictures, we're just about where we wanted to be. Shelves are all hung, walls are painted, and we even had time to string up some lights in the front part of the floor. It feels really good to see one part of our vision of the house coming together.
We also spent a good part of the time working on our soon-to-be bedroom on the second floor. This was one of those projects that went from simple to ugly fairly quickly. To give you an idea of the history, the room originally looked like this:


Several weeks, three garbage cans worth of plaster debris (and let me tell you, that stuff is HEAVY), one roll of Romex 12/2 wiring, and 12 sheets of drywall later, we are now taping and sanding the room in preparation for painting it. Once that's done, all that will be left is putting in a laminate wood floor, and we will have completed our first full out renovation!
Oh, and if anyone out there has some tips for putting in laminate floors, feel free to leave them here on the blog, as we've never tackled that before. Come to think of it, we've never really tackled any of this before!
Sunday, January 28, 2007
Well, we've officially killed our first tools. Yesterday my poor loyal Dremel tool decided to bite the dust (literally) while cutting openings in drywall. With a blood-curdling shriek and an awful smell, it left us to use a utility knife to cut holes for outlets. Luckily, we only had one more to do!
Then this morning, Marji's (Amy's mom) drill also died as we were drilling holes to mount shelves in the dining area. Guess old house wood can be pretty tough, huh? I felt bad since they were kind enough to drive down from Connecticut to help us with our never-ending To-Do list. Thankfully we had a few extra drills.
Two tools in two days... this house is starting to take its toll!
Saturday, January 27, 2007
Well, here it is, my first blog post! Or at least, my first blog post on here. :)
Owning an old house is going to be an interesting experience. Already I've been covered in plaster, drywall dust, dirt, brick dust, and various other substances. I've crawled through tiny spaces that previously would have triggered my oh-so-mild case of claustrophobia, all in the name of a new electrical outlet (note: it was rather important to do so, since otherwise we lost power to the fridge if we wanted to turn the juice off for the second floor... go figure!).
Amy and I decided when we bought the house that we wanted to share our experiences of slowly fixing the house and making it our own. We're hoping for a solid mix of encouragement, how-to, and maybe even some good old fashioned commiserating at times! From reading the posts on the various other fixer-upper blogs on the net, it seems the task of repairing old houses is equally challenging and rewarding.
So sit back and enjoy our stories as we experience this love-hate relationship for the first (and hopefully not the last) time. We're certainly looking forward to it!
Subscribe to:
Posts (Atom)


